An Overview of the Lost Wax Casting Process
Lost wax casting is a popular technique for producing intricate pieces of metal-based artwork. This method of metalworking has been around for thousands of years, with the oldest known items produced in this manner including jewellery from the Indus Valley Civilization of South Asia and artifacts from Nahal Mishmar (English: “Cave of the Treasure”) in southern Palestine, each dated as being at least 5700 years old. Lost wax casting, sometimes called “investment casting” or “precision casting”, remained the dominant form of metal casting until piece moulding, a production method involving the joining of separate pieces created from multiple different casts, became more standard in the 18th century. While piece moulding was preferred for the production of larger metalworks, the use of lost wax casting continued for some projects, and it heavily persisted within the jewellery industry due its ability to execute highly detailed designs with precision and speed. Some slight changes to the process have occurred over the past few millennia, but overall the steps taken to execute a lost wax cast have remained largely the same:
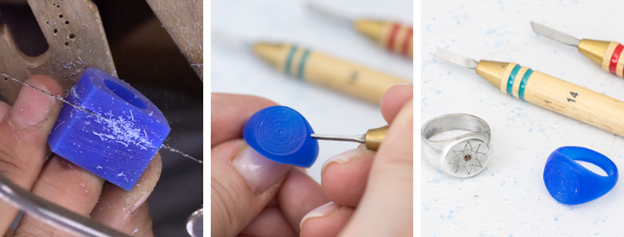
Step 1 - Obtaining a Wax Model Base
First, a model of the desired product is sculpted. If the model is meant for a single use casting then it would be carved from wax and be taken immediately to the next step. In the case of jewellery designs which feature set gemstones, the desired stone is often placed directly into the wax blank and the setting is carved into form around it before removal to ensure a snug fit in the finished jewellery piece. For mass production, the original model may be carved from wax, or another rigid but soft material such as clay, before then making a mould to allow for the production of multiple wax copies; the copies made from a mould will often have a hollow core to allow for a better flow of wax during the “burnout” step later in the casting process and typically must also be “chased” after removal from the mould, a step which involves smoothing out areas on the model where the mould’s parting lines and/or other surface imperfections are visible. In the contemporary era, wax models are sometimes obtained by first being sculpted with computer aided design before being rendered by a 3D printer in wax, or if the model is to be used as the base for a mould it will be 3D printed in resin.


Step 2 - “Spruing” the Wax Model
Once a wax model suitable for casting has been obtained, this model is then “sprued”. This step involves attaching multiple wax supports to various locations on the model, often resembling a tree-like shape once complete. These added wax supports are typically oriented in a similar direction relative to the model as a whole and cause the formation of hollow channels within the shell that is used to form the final metal cast so as to allow metal to flow throughout the shell unimpeded.

Step 3 - Coating the Wax Model with “Slurry”
After spruing, the wax model is coated with a shell of refractory “slurry”. This coating is usually a form of ceramic that is encased around the wax model layer by layer, often by dipping the model, but it may also be composed of other heat resistant materials. This part of the lost wax casting process is sometimes also called “investment” and is the source of the term “investment casting”.

Step 4 - “Burnout” of the Slurried Model
Upon complete investment of the wax model and subsequent hardening of the shell, the encased model is placed upside down in a furnace or kiln and heated to allow for the wax contained within to melt and flow out of the shell; this step is known as “burnout”. In some cases a flat surface is sliced into the top of the slurry after hardening to facilitate being inverted while this step takes place, while in other cases a support is used to keep the slurry shell upright as it is heated. What remains after the burnout step is a specialised mould which can withstand the stress of contact with molten metal but also contains a highly precise impression of the original model. At this stage the shell is often tested with water to ensure that it has no cracks but also allows fluids to freely flow within it.

Step 5 - Pouring the Cast Material
After the wax model has been burnt out of its shell, metal is poured into the channels left behind by the wax sprues; this step must take place while the hardened slurry is still hot in order to prevent cracking from temperature differences between it and molten metal. Once sufficient metal has been introduced into the shell it is allowed to cool.

Step 6 - Release of the Solidified Cast
When the new cast has completely solidified it is released from its shell. Releasing the cast usually requires complete destruction of the casting shell and may involve tools such as chisels, hammers, and/or sandblasters.

Step 7 - Chasing the Finished Cast
Following release, the final cast is then cut free from the metal rods left behind by the sprue channels and chased in order to remove surface imperfections. Once chased, the cast is ready for use and/or may be sent off for additional finishing such as painting, stone setting, and/or enamelling.

© Yaĝé Enigmus


